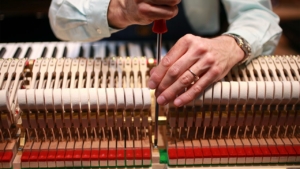
Tune The Piano and All You Need to Know
Having worked as a piano tuner for many years, we have researched and synthesized case studies, papers, and articles on the industry. To guarantee that the piano’s sound quality is consistently precise, piano tuning is a recurring task. If you would rather not pay for a tuner, please see the page below for instructions on how to tune the piano at home.
Reading More:
- The Importance of Humidity for Pianos
- How to Maintain a Grand Piano
- How to maintain an electric piano
- 7 Easiest Ways to Improve Your Piano Playing Technique
- 12+ Benefits of Playing Piano
How to tune the piano?
Selecting a damper
Hammer is the first choice! You’ll also need to get ready a piano damper in addition to the hammer. A piano note can have up to three strings; you can separate the strings by using a damper. You should select a damper with a plastic clip for upright pianos. You should select a damper with a rubber mute for grand pianos.

How to tune the piano?
Choose a tuning machine or software
If you are not an expert, you will surely find problems in tuning the piano. To assist you in accomplishing this, tuning machines and software is a must for piano repair and tuning.
How to tune a piano yourself at home?
Piano tune price is currently quite high in the Vietnam market. So, we understand that you may want to know how to tune the piano yourself at home. Let’s find out below.

Tune a piano at home
Remove the lid and check the piano strings
To tune the piano, you first need to remove and assemble the piano and have a certain grasp of the structure of the piano. The top lid of an upright piano must be lifted, the lid must be removed, the key cover must be removed, and lastly the middle pedal damper must be removed.
It’s considerably easier with a grand piano; all you have to do is lift the top lid and remove the music book holder. This method also allows you to look inside the piano case and inspect it for any potential problems or filth. Before going to how tune a piano, give it a thorough cleaning.
Start with the notes in the middle of the keys
The notes in the middle of the keys should be where you begin while tuning the piano. because too high (treble) or too low (bass) of a frequency is where the accuracy of the piano tuning devices and software available today is lacking. To be precise while altering the bass or treble notes at the two ends of the keys, you must listen.
The majority of musical instruments have standard pitch of A 440Hz, which indicates that the primary frequency of the vibrating A note is 440Hz. Note A4, or the fourth A note on the piano, is where the standard A 440Hz pitch is found. Thus, keep in mind to tune the piano to A440Hz while using a machine or software for tuning.
Note F3 is usually where we begin tuning, rather than note A4. There are normally three strings on this note, so you’ll need to cover the second and third strings with a sound blocker. Next, use a machine (or software) to tune the first string. This is a really simple step that practically anyone can perform.
Once the first string is obtained, the damper is moved to cover the third string, and the second string is then tuned in accordance with the first string that was just adjusted. To check by ear, listen for a straight line-like (beatless) sound if both strings vibrate at the same frequency. They will produce ripples (beating) if they are not at the same frequency. The two piano strings need to vibrate at the same frequency, so your job is to modify.
How to adjust the piano tuning shafts
It can be very challenging to adjust and manipulate the tuning shafts if you are just learning how to tune a piano. Although it takes a lot of effort to turn the stringing shaft, even a tiny adjustment will cause the string to stray. It takes a lot of practice to become proficient at it.
Keep in mind that moving the shaft with the stringing hammer in a clockwise direction tightens the string, while turning it in a counterclockwise direction loosens it. The secret to preventing the string from falling too soon after tuning. In other words, you need to tighten the string slightly before lowering it to the proper pitch.
Tuning by octave Check the accuracy
Following your note F3 from step 3. Note F2 and note F4 adjustments are now simpler. It is no longer necessary for you to use a computer or software. The challenge is in hearing two tones that are one octave apart.
The method for hearing two notes Step 3 is analogous to listening to two strings of the same pitch separated by one octave. Two notes played at exactly one octave apart will produce a straight line-like sound. Conversely, you’ll hear the sound of ripples as mentioned above.
Complete and check the entire instrument
You should check everything one more time to make sure everything is in order and that the notes are tuned correctly. Sometimes there are notes that you have just tuned, merely by striking a few keys hard you can discover the string deviation (the variance is generally insignificant). You must adjust any key that is significantly off to the proper level.
Conclusion
You will need the following instruments, at minimum, to tune your own guitar: Three items: a damper, a tuning hammer, and a tuning computer/software. Fundamental tuning order: To access the interior, remove the lid. Next, use the device/software to tune the notes in the middle of the keyboard (often from F3 to E4). To tune the remaining keys, tune your headphones to the notes that are one octave apart after you have the standard Octave set (from F3 to E4).
Listening rule: Two sounds will sound the same and resemble “a straight line” if they are at the same frequency or one octave apart. Should there be a disparity, the two noises will clash and produce a whirring noise. Finally, we hope you find the information useful. If you need support, do not hesitate to contact us. Follow pianos in the parks to learn more about piano!


Leave a Reply
Want to join the discussion?Feel free to contribute!